
Cattleyas readily grow outside of their pot. When they do grow outside their pot often that part of the plant inside the pot is in poor condition with little or no viable psuedo bulbs, whilst that part of the plant growing outside of the pot is healthy. If you remove the plant from its pot the potting medium has broken down and often turns into mud and the plant has little or no viable root system within the pot. Occasionally they recover sending out new shoots and regrow back to viable plants. If that portion of the plant that was growing outside of the pot is re-potted back into the original potting medium the plant struggles and eventually dies.
Bark and perlite is commonly used as a potting medium suitable for all orchids. The pot needs to have high drainage like the “port” pots available from Orchid Den.
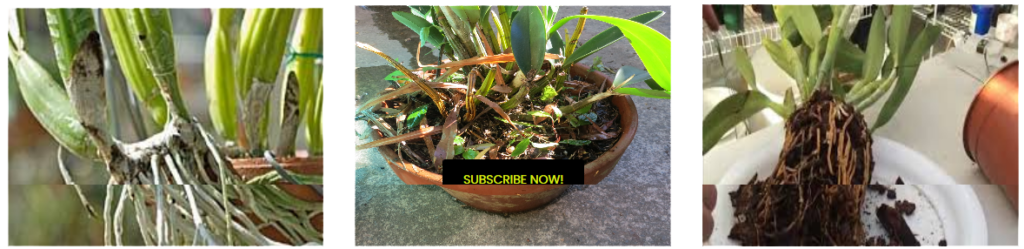
Cattleyas grow in the rainforests of South America. They are both epiphytes (an epiphyte is a plant that lives above the ground on another plant, using the plant for support, they are not a parasite they merely use the plant for support and obtain their nutrition for the environment.) and lithophytes (lithophytes are plants that grow in or on rocks, again obtaining nutrition for the environment.) The majority of Cattleyas are epiphytes growing high in tree canopy of the rainforests, where they receive indirect sunlight. Cattleyas have a horizontal rhizome and regardless of whether they grow on trees or on rocks the rhizome freely travels along the branches or over the rocks. The root system grows from the rhizome securing the plant to its host whilst at the same time obtaining nutrients from the atmosphere. The rainforests are high in humidity and subjected to heavy rainfall almost all year round. Even during the heaviest of rainfalls the water runs straight off, the roots never remain wet, they dry out between rainfalls.
- The rhizome freely travels along the branches or over the rocks.
- The root system is not enclosed but is exposed to the environment.
- The roots must dry out between watering
- The plant requires regular water and bright indirect light.
Submerge the entire pot in water for 20 minutes, this will soften the roots making the plant easier to remove. If the plant is growing outside of the pot and the roots have attached themselves to the pot, use a filleting knife and just like filleting a fish hold the knife on an angle then using the point of the knife put the knife between the pot and the attached roots and run the knife down behind the attached roots. Don’t worry if you do damage some of the roots in want matter, quite often you may even need to cut some of the roots. After removing the attached roots from the pot hold the plant with one and and with the other hand hit the rim of the pot with a rubber mallet (If you don’t have a rubber mallet, an ordinary hammer is OK) the pot should then come away from the plant quite easily.
- Remove as much of the old potting mix as possible. Start with your hands and finish off by using the garden hose, hosing will not hurt the plant and you can really get the roots very clean.
- Prepare your new growing medium by soaking it in water with Chlortan 720 added to kill any fungus that may be on the roots.
- Examine the plant and cut off any dead roots, dead pseudo bulbs, dead flower stems and any leaves that may have a fungus disease.
- If you want to divide the plant cut the rhizome, ensuring the plant has at least 4 phsodo-bulbs on each side of the cutting. Seal the cut on both pieces with a paste made from Mancozeb fungicide.
- Soak the plant for approximately 20 minutes in a mixture of water and Multicrop Plant Starter, this will assist in developing new growth buds.
- Sprinkle Root Extender on the roots, to encourage root growth.
Always use a good quality growing medium, don’t be tempted to buy from retailers that don’t specialise in Orchids, just because it is cheaper and is labelled Orchid Mix. You may be purchasing a mix that is inferior or is unsuitable for the type of orchid that you are re-potting. Purchase your orchid mix from a vendor that specialises in the growing of orchids. Orchid Den has an excellent range of potting mediums, mixed by Orchid Den to suit the requirements for different orchid varieties.
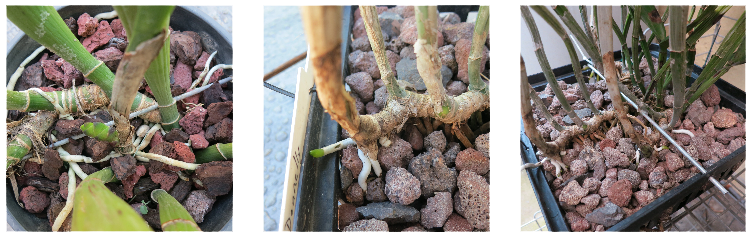
Cattleyas do not like being in a pot with little drainage, the potting mix remains too wet, breaks down a rots the roots, they like to get their roots into the atmosphere and have difficulty in getting their roots into the atmosphere in an enclosed pot. Cattleyas tend to have shallow roots with an horizontal rhyzome that travels sideways. You can use one of our port pots or square vanda pots. Not too deep, have good drainage, and the Cattleya’s roots can easily meander through the growing medium and into the atmosphere where they belong naturally.
Laleias and Laleia hybrids tend to have longer roots and are more suitable to a deeper pot.

Now that you have decided on the type of pot and the type of potting medium, time to pot the orchid. If the roots are long don’t be afraid to give them a hair cut. Cutting the roots is beneficial as it encourages new root growth. Similar to when you prune a bush, the pruning encourages new growth. Place a small amount of the damp potting medium in the bottom of the pot. Cattleyas will normally grow in one direction, the direction that it has grown from is placed against the side of the pot to allow the plant sufficient room to grow. When using square Vanda pots position the plant diagonally by placing the end that it has grown from in one corner. Hold the plant so that the horizontal rhizome is just below the rim of the pot. Whilst holding the plant in that position cover the roots with potting mix, pressing firmly. The horizontal rhizome should be sitting on the top of the potting mix, do not cover the horizontal rhizome with the potting mix. To get good root growth the plant must be held firmly in the pot and not allowed to wobble around. Examine the horizontal rhizome and select a place on the horizontal rhizome where you can secure the plant with a wire over the top of the rhizome. Drill a hole on one side of the pot and pass a piece of wire through the hole, over the top of the rhizome and through another hole in the opposite of the pot. Do not pre-drill the second hole. After you have fed the wire through the first hole and over the rhizome you will be able select the correct position for the second hole. The second hole should be placed so that you need to press down on the wire to get it into the hole. By pressing down on the wire will secure the plant firmly in place. Cut off any excess wire.